1. 개요
이 사용방법(예제)에서는 Spring OAuth2RestTemplate 을 사용하여 OAuth2 REST 호출을 만드는 방법을 배웁니다 .
GitHub 계정의 리포지토리를 나열할 수 있는 Spring 웹 애플리케이션을 만들 것입니다.
2. 메이븐 설정
먼저 pom.xml 에 spring-boot-starter-security 및 spring-security-oauth2-autoconfigure 의존성을 추가해야 합니다. 웹 애플리케이션을 구축할 때 spring-boot-starter-web 및 spring-boot-starter-thymeleaf 아티팩트도 포함해야 합니다.
<dependency>
    <groupId>org.springframework.boot</groupId>
    <artifactId>spring-boot-starter-web</artifactId>
</dependency>
<dependency>
    <groupId>org.springframework.boot</groupId>
    <artifactId>spring-boot-starter-security</artifactId>
</dependency>
<dependency>
    <groupId>org.springframework.security.oauth.boot</groupId>
    <artifactId>spring-security-oauth2-autoconfigure</artifactId>
    <version>2.6.8</version>
</dependency>
<dependency>
    <groupId>org.springframework.boot</groupId>
    <artifactId>spring-boot-starter-thymeleaf</artifactId>
</dependency>
3. OAuth2 속성
다음 으로 GitHub 계정에 연결할 수 있도록 application.properties 파일에 OAuth 구성을 추가해 보겠습니다 .
github.client.clientId=[CLIENT_ID]
github.client.clientSecret=[CLIENT_SECRET]
github.client.userAuthorizationUri=https://github.com/login/oauth/authorize
github.client.accessTokenUri=https://github.com/login/oauth/access_token
github.client.clientAuthenticationScheme=form

github.resource.userInfoUri=https://api.github.com/user
github.resource.repoUri=https://api.github.com/user/repos
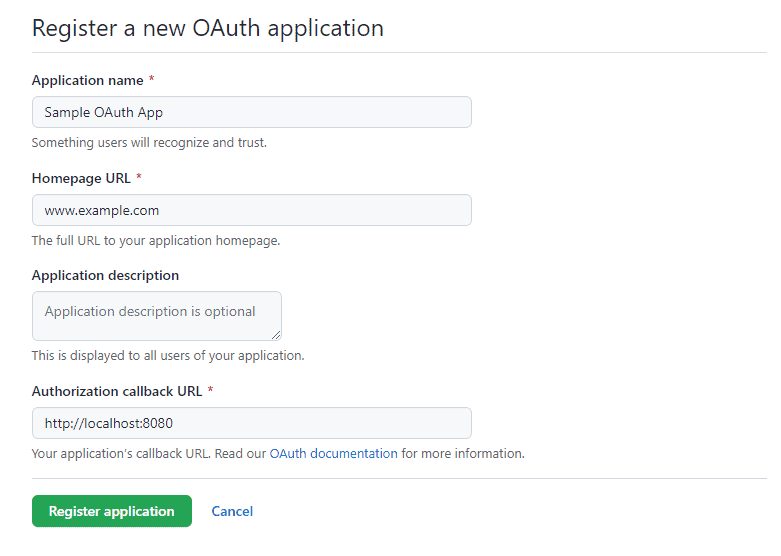
[ CLIENT_ID] 및 [CLIENT_SECRET] 을 GitHub OAuth 앱의 값 으로 바꿔야 합니다. OAuth 앱 만들기 사용방법(예제)에 따라 GitHub에 새 앱을 등록할 수 있습니다.

Authorization 콜백 URL이 http://localhost:8080 으로 설정되어 있는지 확인 하여 OAuth 흐름을 웹 애플리케이션 홈 페이지로 리디렉션합니다.
4. OAuth2RestTemplate 구성
이제 애플리케이션에 OAuth2 지원을 제공하기 위한 Security 구성을 생성할 차례입니다.
4.1. SecurityConfig 클래스 _
먼저 Spring의 Security 구성을 생성해 보겠습니다.
@Configuration
@EnableOAuth2Client
public class SecurityConfig {
    OAuth2ClientContext oauth2ClientContext;

    public SecurityConfig(OAuth2ClientContext oauth2ClientContext) {
        this.oauth2ClientContext = oauth2ClientContext;
    }

    ...
}
@EnableOAuth2Client 는 OAuth2RestTemplate 을 만드는 데 사용할 OAuth2 컨텍스트에 대한 액세스를 제공합니다 .
4.2. OAuth2RestTemplate 빈
두 번째로 OAuth2RestTemplate 에 대한 빈을 생성합니다 .
@Bean
public OAuth2RestTemplate restTemplate() {
    return new OAuth2RestTemplate(githubClient(), oauth2ClientContext);
}

@Bean
@ConfigurationProperties("github.client")
public AuthorizationCodeResourceDetails githubClient() {
    return new AuthorizationCodeResourceDetails();
}
이를 통해 OAuth2 속성과 컨텍스트를 사용하여 템플릿의 인스턴스를 만듭니다.
@ConfigurationProperties 어노테이션은 모든 github.client 속성을 AuthorizationCodeResourceDetails 인스턴스 에 주입합니다.
4.3. 인증 필터
셋째, OAuth2 흐름을 처리하기 위한 인증 필터가 필요합니다.
private Filter oauth2ClientFilter() {
    OAuth2ClientAuthenticationProcessingFilter oauth2ClientFilter = new OAuth2ClientAuthenticationProcessingFilter("/login/github");
    OAuth2RestTemplate restTemplate = restTemplate();
    oauth2ClientFilter.setRestTemplate(restTemplate);
    UserInfoTokenServices tokenServices = new UserInfoTokenServices(githubResource().getUserInfoUri(), githubClient().getClientId());
    tokenServices.setRestTemplate(restTemplate);
    oauth2ClientFilter.setTokenServices(tokenServices);
    return oauth2ClientFilter;
}

@Bean
@ConfigurationProperties("github.resource")
public ResourceServerProperties githubResource() {
    return new ResourceServerProperties();
}
여기에서 필터에 애플리케이션의 /login/github URL에서 OAuth2 흐름을 시작하도록 지시합니다.
4.4. 스프링 Security 설정
마지막으로 OAuth2ClientContextFilter 를 등록하고 웹 Security 구성을 생성해 보겠습니다.
@Bean
public SecurityFilterChain filterChain(HttpSecurity http) throws Exception {
    http.authorizeRequests()
        .antMatchers("/", "/login**", "/error**")
        .permitAll()
        .anyRequest()
        .authenticated()
        .and()
        .logout()
        .logoutUrl("/logout")
        .logoutSuccessUrl("/")
        .and()
        .addFilterBefore(oauth2ClientFilter(), BasicAuthenticationFilter.class);
    return http.build();
}

@Bean
public FilterRegistrationBean<OAuth2ClientContextFilter> oauth2ClientFilterRegistration(OAuth2ClientContextFilter filter) {
    FilterRegistrationBean<OAuth2ClientContextFilter> registration = new FilterRegistrationBean<>();
    registration.setFilter(filter);
    registration.setOrder(Ordered.HIGHEST_PRECEDENCE + 1);
    return registration;
}
웹 애플리케이션 경로를 보호하고 OAuth2ClientAuthenticationProcessingFilter 가 BasicAuthenticationFilter 보다 먼저 등록되었는지 확인합니다 .
5. OAuth2RestTemplate 사용
OAuth2RestTemplate 의 주요 목표는 OAuth2 기반 API 호출을 수행하는 데 필요한 코드를 줄이는 것 입니다. 기본적으로 애플리케이션에 대한 두 가지 요구 사항을 충족합니다.
- OAuth2 인증 흐름을 처리합니다.
- API 호출을 위한 Spring RestTemplate 확장
이제 OAuth2RestTemplate 을 웹 컨트롤러에서 자동으로 연결된 빈으로 사용할 수 있습니다.
5.1. 로그인
로그인 및 홈 옵션을 사용하여 index.html 파일을 생성해 보겠습니다 .
<!DOCTYPE html>
<html lang="en" xmlns="http://www.w3.org/1999/xhtml" xmlns:th="http://www.thymeleaf.org">
<head>
    <title>OAuth2Client</title>
</head>
<body>
<h3>
    <a href="/login/github" th:href="@{/home}" th:if="${#httpServletRequest?.remoteUser != undefined }">
        Go to Home
    </a>
    <a href="/hello" th:href="@{/login/github}" th:if="${#httpServletRequest?.remoteUser == undefined }">
        GitHub Login
    </a>
</h3>
</body>
</html>
인증되지 않은 사용자에게는 로그인 옵션이 표시되고 인증된 사용자는 홈 페이지에 액세스할 수 있습니다.
5.2. 집
이제 인증된 GitHub 사용자를 맞이하는 컨트롤러를 만들어 보겠습니다.
@Controller
public class AppController {

    OAuth2RestTemplate restTemplate;

    public AppController(OAuth2RestTemplate restTemplate) {
        this.restTemplate = restTemplate;
    }

    @GetMapping("/home")
    public String welcome(Model model, Principal principal) {
        model.addAttribute("name", principal.getName());
        return "home";
    }
}
welcome 메소드 에 security Principal 매개변수 가 있음을 주목 하십시오. Principal 의 이름을 UI 모델의 속성으로 사용 하고 있습니다.
home.html 템플릿 을 살펴보겠습니다 .
<!DOCTYPE html>
<html lang="en" xmlns="http://www.w3.org/1999/xhtml" xmlns:th="http://www.thymeleaf.org">
<head>
    <title>Home</title>
</head>
<body>
    <p>
        Welcome <b th:inline="text"> [[${name}]] </b>
    </p>
    <h3>
        <a href="/repos">View Repositories</a><br/><br/>
    </h3>

    <form th:action="@{/logout}" method="POST">
        <input type="submit" value="Logout"/>
    </form>
</body>
</html>
또한 사용자의 저장소 List과 로그아웃 옵션을 볼 수 있는 링크를 추가하고 있습니다.
5.3. GitHub 저장소
이제 이전 컨트롤러에서 만든 OAuth2RestTemplate 을 사용 하여 사용자가 소유한 모든 GitHub 저장소를 표시할 차례입니다.
먼저 저장소를 나타내는 GithubRepo 클래스를 만들어야 합니다.
public class GithubRepo {
    Long id;
    String name;

    // getters and setters

}
둘째, 이전 AppController 에 매핑되는 리포지토리를 추가해 보겠습니다 .
@GetMapping("/repos")
public String repos(Model model) {
    Collection<GithubRepo> repos = restTemplate.getForObject("https://api.github.com/user/repos", Collection.class);
    model.addAttribute("repos", repos);
    return "repositories";
}
OAuth2RestTemplate 은 GitHub에 요청하기 위한 모든 상용구 코드를 처리합니다 . 또한 REST 응답을 GithubRepo 컬렉션으로 변환합니다.
마지막으로 리포지토리 컬렉션을 반복할 reppositories.html 템플릿을 만들어 보겠습니다 .
<!DOCTYPE html>
<html lang="en" xmlns="http://www.w3.org/1999/xhtml" xmlns:th="http://www.thymeleaf.org">
<head>
    <title>Repositories</title>
</head>
<body>
    <p>
        <h2>Repos</h2>
    </p>
    <ul th:each="repo: ${repos}">
        <li th:text="${repo.name}"></li>
    </ul>
</body>
</html>
6. 결론
이 기사에서는 OAuth2RestTemplate 을 사용하여 GitHub와 같은 OAuth2 리소스 서버에 대한 REST 호출을 단순화 하는 방법을 배웠습니다.
OAuth2 흐름을 실행하는 웹 애플리케이션의 빌딩 블록을 살펴보았습니다. 그런 다음 GitHub 사용자의 모든 저장소를 검색하기 위해 REST API를 호출하는 방법을 보았습니다.
항상 그렇듯이 이 예제의 전체 예제는 GitHub 에서 찾을 수 있습니다 .

