1. 개요
멀티테넌시는 소프트웨어 애플리케이션의 단일 인스턴스가 여러 테넌트 또는 고객에게 서비스를 제공 하는 아키텍처를 나타냅니다 .
테넌트가 사용하는 데이터와 리소스가 다른 것과 분리되도록 테넌트 간에 필요한 수준의 격리가 가능합니다.
이 사용방법(예제)에서는 Spring Data JPA를 사용하여 Spring Boot 애플리케이션에서 다중 테넌시를 구성하는 방법을 살펴봅니다. 또한 JWT 를 사용하여 테넌트에 Security을 추가합니다 .
2. 멀티 테넌시 모델
다중 테넌트 시스템에는 세 가지 주요 접근 방식이 있습니다.
- 별도의 데이터베이스
- 공유 데이터베이스 및 별도의 스키마
- 공유 데이터베이스 및 공유 스키마
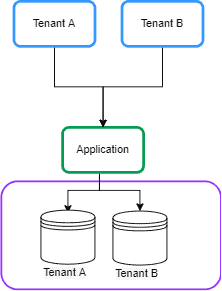
2.1. 별도의 데이터베이스
이 접근 방식에서 각 테넌트의 데이터는 별도의 데이터베이스 인스턴스에 보관되며 다른 테넌트와 격리됩니다. 이는 테넌트당 데이터베이스 라고도 합니다 .

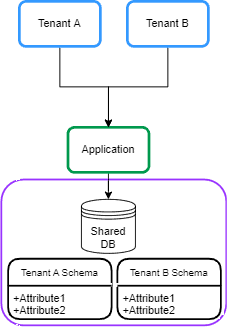
2.2. 공유 데이터베이스 및 별도의 스키마
이 접근 방식에서 각 테넌트의 데이터는 공유 데이터베이스의 개별 스키마에 보관됩니다. 이를 테넌트당 스키마 라고도 합니다 .

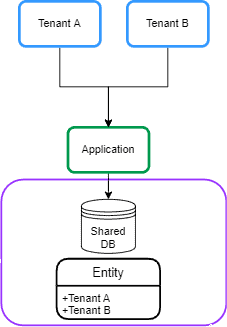
2.3. 공유 데이터베이스 및 공유 스키마
이 접근 방식에서 모든 테넌트는 데이터베이스를 공유하고 모든 테이블에는 테넌트 식별자가 포함된 열이 있습니다.

3. 메이븐 의존성
pom.xml 의 Spring Boot 애플리케이션에서 spring-boot-starter-data-jpa 의존성 을 선언하여 시작하겠습니다 .
<dependency>
    <groupId>org.springframework.boot</groupId>
    <artifactId>spring-boot-starter-data-jpa</artifactId>
</dependency>
또한 PostgreSQL 데이터베이스를 사용할 것이므로 pom.xml 파일 에 postgresql 의존성 도 추가해 보겠습니다.
<dependency>
    <groupId>org.postgresql</groupId>
    <artifactId>postgresql</artifactId>
    <scope>runtime</scope>
</dependency>
별도의 데이터베이스 및 공유 데이터베이스와 별도의 스키마 접근 방식은 Spring Boot 애플리케이션의 구성과 유사합니다. 이 사용방법(예제)에서는 데이터베이스 분리 방식에 중점을 둡니다 .
4. 동적 데이터 소스 라우팅
이 섹션에서는 테넌트당 데이터베이스 모델 의 일반적인 개념을 설명합니다 .
4.1. AbstractRoutingDataSource
Spring Data JPA로 다중 테넌시를 구현하는 일반적인 아이디어 는 현재 테넌트 식별자를 기반으로 런타임에 데이터 소스를 라우팅하는 것입니다.
이를 위해 AbstractRoutingDatasource 를 현재 테넌트를 기반으로 실제 DataSource 를 동적으로 결정하는 방법으로 사용할 수 있습니다.
AbstractRoutingDataSource 클래스 를 확장 하는 MultitenantDataSource 클래스를 만들어 보겠습니다 .
public class MultitenantDataSource extends AbstractRoutingDataSource {

    @Override
    protected String determineCurrentLookupKey() {
        return TenantContext.getCurrentTenant();
    }
}
AbstractRoutingDataSource 는 검색 키를 기반으로 getConnection 호출을 다양한 대상 DataSource 중 하나로 라우팅 합니다.
조회 키는 일반적으로 일부 스레드 바인딩된 트랜잭션 컨텍스트를 통해 결정됩니다. 따라서 각 요청에 현재 테넌트를 저장하기 위한 TenantContext 클래스를 만듭니다 .
public class TenantContext {

    private static final ThreadLocal<String> CURRENT_TENANT = new ThreadLocal<>();

    public static String getCurrentTenant() {
        return CURRENT_TENANT.get();
    }

    public static void setCurrentTenant(String tenant) {
        CURRENT_TENANT.set(tenant);
    }
}
현재 요청에 대한 테넌트 ID를 유지하기 위해 ThreadLocal 개체를 사용합니다 . 또한 set 메서드를 사용하여 테넌트 ID를 저장하고 get() 메서드를 사용하여 검색합니다.
4.2. 요청별 테넌트 ID 설정
이 구성 설정 후 테넌트 작업을 수행할 때 트랜잭션을 생성하기 전에 테넌트 ID를 알아야 합니다 . 따라서 컨트롤러 Endpoints에 도달하기 전에 필터 또는 인터셉터 에서 테넌트 ID를 설정해야 합니다.
TenantContext 에서 현재 테넌트를 설정하기 위한 TenantFilter 를 추가해 보겠습니다 .
@Component
@Order(1)
class TenantFilter implements Filter {

    @Override
    public void doFilter(ServletRequest request, ServletResponse response,
      FilterChain chain) throws IOException, ServletException {

        HttpServletRequest req = (HttpServletRequest) request;
        String tenantName = req.getHeader("X-TenantID");
        TenantContext.setCurrentTenant(tenantName);

        try {
            chain.doFilter(request, response);
        } finally {
            TenantContext.setCurrentTenant("");
        }

    }
}
이 필터에서는 요청 헤더 X-TenantID 에서 테넌트 ID를 가져와 TenantContext 에 설정합니다 . 필터 체인 아래로 제어를 전달합니다. finally 블록은 현재 테넌트가 다음 요청 전에 재설정되도록 합니다. 이렇게 하면 교차 테넌트 요청 오염의 위험이 방지됩니다.
다음 섹션에서는 Database per Tenant 모델에서 테넌트 및 데이터 소스 선언을 구현합니다.
5. 데이터베이스 접근
이 섹션에서는 테넌트당 데이터베이스 모델 을 기반으로 다중 테넌시를 구현 합니다.
5.1. 임차인 선언
이 접근 방식에서는 여러 데이터베이스가 있으므로 Spring Boot 애플리케이션에서 여러 데이터 소스를 선언해야 합니다.
별도의 테넌트 파일에서 DataSource 를 구성할 수 있습니다 . 따라서 allTenants 디렉터리에 tenant_1.properties 파일을 생성 하고 테넌트의 데이터 소스를 선언합니다.
name=tenant_1
datasource.url=jdbc:postgresql://localhost:5432/tenant1
datasource.username=postgres
datasource.password=123456
datasource.driver-class-name=org.postgresql.Driver
또한 다른 테넌트에 대한 tenant_2.properties 파일을 생성합니다.
name=tenant_2
datasource.url=jdbc:postgresql://localhost:5432/tenant2
datasource.username=postgres
datasource.password=123456
datasource.driver-class-name=org.postgresql.Driver
각 테넌트에 대한 파일로 끝납니다.

5.2. 데이터 소스 선언
이제 테넌트의 데이터를 읽고 DataSourceBuilder 클래스 를 사용하여 DataSource 를 생성해야 합니다 . 또한 AbstractRoutingDataSource 클래스 에서 DataSources 를 설정합니다.
이에 대한 MultitenantConfiguration 클래스를 추가해 보겠습니다 .
@Configuration
public class MultitenantConfiguration {

    @Value("${defaultTenant}")
    private String defaultTenant;

    @Bean
    @ConfigurationProperties(prefix = "tenants")
    public DataSource dataSource() {
        File[] files = Paths.get("allTenants").toFile().listFiles();
        Map<Object, Object> resolvedDataSources = new HashMap<>();

        for (File propertyFile : files) {
            Properties tenantProperties = new Properties();
            DataSourceBuilder dataSourceBuilder = DataSourceBuilder.create();

            try {
                tenantProperties.load(new FileInputStream(propertyFile));
                String tenantId = tenantProperties.getProperty("name");

                dataSourceBuilder.driverClassName(tenantProperties.getProperty("datasource.driver-class-name"));
                dataSourceBuilder.username(tenantProperties.getProperty("datasource.username"));
                dataSourceBuilder.password(tenantProperties.getProperty("datasource.password"));
                dataSourceBuilder.url(tenantProperties.getProperty("datasource.url"));
                resolvedDataSources.put(tenantId, dataSourceBuilder.build());
            } catch (IOException exp) {
                throw new RuntimeException("Problem in tenant datasource:" + exp);
            }
        }

        AbstractRoutingDataSource dataSource = new MultitenantDataSource();
        dataSource.setDefaultTargetDataSource(resolvedDataSources.get(defaultTenant));
        dataSource.setTargetDataSources(resolvedDataSources);

        dataSource.afterPropertiesSet();
        return dataSource;
    }

}
먼저 allTenants 디렉터리 에서 테넌트의 정의를 읽고 DataSourceBuilder 클래스 를 사용하여 DataSource 빈을 생성합니다. 그런 다음 각각 setDefaultTargetDataSource 및 setTargetDataSources 를 사용하여 연결할 MultitenantDataSource 클래스 의 기본 데이터 소스 및 대상 소스를 설정해야 합니다 . defaultTenant 속성 을 사용하여 application.properties 파일 에서 테넌트 이름 중 하나를 기본 데이터 소스로 설정 합니다. 데이터 소스의 초기화를 완료하기 위해 afterPropertiesSet() 메서드를 호출합니다.
이제 설정이 준비되었습니다.
6. 테스트
6.1. 테넌트용 데이터베이스 생성
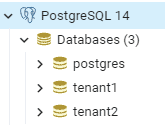
먼저 PostgreSQL 에서 두 개의 데이터베이스를 정의해야 합니다 .

그런 다음 아래 스크립트를 사용하여 각 데이터베이스에 직원 테이블을 만듭니다.
create table employee (id int8 generated by default as identity, name varchar(255), primary key (id));6.2. 샘플 컨트롤러
요청 헤더의 지정된 테넌트에 Employee 엔터티를 만들고 저장하기 위한 EmployeeController 클래스를 만들어 보겠습니다 .
@RestController
@Transactional
public class EmployeeController {

    @Autowired
    private EmployeeRepository employeeRepository;

    @PostMapping(path = "/employee")
    public ResponseEntity<?> createEmployee() {
        Employee newEmployee = new Employee();
        newEmployee.setName("Baeldung");
        employeeRepository.save(newEmployee);
        return ResponseEntity.ok(newEmployee);
    }
}
6.3. 샘플 요청
Postman 을 사용하여 테넌트 ID tenant_1 에 직원 엔터티 를 삽입하기 위한 게시 요청을 생성해 보겠습니다 .

또한 tenant_2 에 요청을 보냅니다 .

그 후 데이터베이스를 확인하면 각 요청이 관련 테넌트의 데이터베이스에 저장되었음을 알 수 있습니다.
7. Security
멀티테넌시는 공유 환경 내에서 고객의 데이터를 보호해야 합니다. 이는 각 테넌트가 자신의 데이터에만 액세스할 수 있음을 의미합니다. 따라서 테넌트에 Security을 추가해야 합니다. 사용자가 애플리케이션에 로그인 하고 JWT를 가져와서 테넌시 액세스 권한을 증명하는 데 사용되는 시스템을 구축해 보겠습니다.
7.1. 메이븐 의존성
pom.xml 에 spring-boot-starter-security 의존성 을 추가하여 시작하겠습니다 .
<dependency>
    <groupId>org.springframework.boot</groupId>
    <artifactId>spring-boot-starter-security</artifactId>
</dependency>
또한 JWT를 생성하고 확인해야 합니다. 이를 위해 pom.xml 에 jjwt 를 추가합니다 .
<dependency>
    <groupId>io.jsonwebtoken</groupId>
    <artifactId>jjwt</artifactId>
    <version>0.9.1</version>
</dependency>
7.2. Security 구성
먼저 테넌트 사용자에 대한 인증 기능을 제공해야 합니다. 간단히 하기 위해 SecurityConfiguration 클래스에서 메모리 내 사용자 선언을 사용하겠습니다.
@Override
protected void configure(AuthenticationManagerBuilder auth) throws Exception {
    auth.inMemoryAuthentication()
      .passwordEncoder(passwordEncoder())
      .withUser("user")
      .password(passwordEncoder().encode("baeldung"))
      .roles("tenant_1");

    auth.inMemoryAuthentication()
      .passwordEncoder(passwordEncoder())
      .withUser("admin")
      .password(passwordEncoder().encode("baeldung"))
      .roles("tenant_2");
}
두 명의 테넌트에 대해 두 명의 사용자를 추가합니다. 또한 테넌트를 역할로 생각합니다. 위의 코드에 따르면 사용자 이름 user 및 admin 은 각각 tenant_1 및 tenant_2 에 액세스할 수 있습니다.
이제 사용자 인증을 위한 필터를 만듭니다. LoginFilter 클래스 를 추가해 보겠습니다 .
public class LoginFilter extends AbstractAuthenticationProcessingFilter {

    public LoginFilter(String url, AuthenticationManager authManager) {
        super(new AntPathRequestMatcher(url));
        setAuthenticationManager(authManager);
    }

    @Override
    public Authentication attemptAuthentication(HttpServletRequest req, HttpServletResponse res)
      throws AuthenticationException, IOException, ServletException {

        AccountCredentials creds = new ObjectMapper().
          readValue(req.getInputStream(), AccountCredentials.class);

        return getAuthenticationManager().authenticate(
          new UsernamePasswordAuthenticationToken(creds.getUsername(),
            creds.getPassword(), Collections.emptyList())
        );
    }
LoginFilter 클래스 는 AbstractAuthenticationProcessingFilter 를 확장 합니다. AbstractAuthenticationProcessingFilter 는 요청을 가로채고 tryingAuthentication() 메서드 를 사용하여 인증을 시도합니다 . 이 방법에서는 사용자 자격 증명을 AccountCredentials DTO 클래스에 매핑하고 메모리 내 인증 관리자에 대해 사용자를 인증합니다.
public class AccountCredentials {

    private String username;
    private String password;

   // getter and setter methods
}
7.3. JWT
이제 JWT를 생성하고 테넌트 ID를 추가해야 합니다. 이를 위해 successfulAuthentication() 메서드를 재정의합니다. 이 메서드는 인증 성공 후 실행됩니다.
@Override
protected void successfulAuthentication(HttpServletRequest req, HttpServletResponse res,
  FilterChain chain, Authentication auth) throws IOException, ServletException {

    Collection<? extends GrantedAuthority> authorities = auth.getAuthorities();
    String tenant = "";
    for (GrantedAuthority gauth : authorities) {
        tenant = gauth.getAuthority();
    }

    AuthenticationService.addToken(res, auth.getName(), tenant.substring(5));
}
위의 코드에 따라 사용자의 역할을 가져와 JWT에 추가합니다. 이를 위해 AuthenticationService 클래스와 addToken() 메서드를 만듭니다.
public class AuthenticationService {

    private static final long EXPIRATIONTIME = 864_000_00; // 1 day in milliseconds
    private static final String SIGNINGKEY = "SecretKey";
    private static final String PREFIX = "Bearer";

    public static void addToken(HttpServletResponse res, String username, String tenant) {
        String JwtToken = Jwts.builder().setSubject(username)
          .setAudience(tenant)
          .setExpiration(new Date(System.currentTimeMillis() + EXPIRATIONTIME))
          .signWith(SignatureAlgorithm.HS512, SIGNINGKEY)
          .compact();
        res.addHeader("Authorization", PREFIX + " " + JwtToken);
    }
addToken 메서드 는 대상 클레임 으로 테넌트 ID를 포함하는 JWT를 생성하고 응답의 Authorization 헤더에 추가했습니다.
마지막으로 SecurityConfiguration 클래스 에 LoginFilter 를 추가합니다.
@Override
protected void configure(HttpSecurity http) throws Exception {
    http
      .authorizeRequests()
      .antMatchers("/login").permitAll()
      .anyRequest().authenticated()
      .and()
      .sessionManagement()
      .sessionCreationPolicy(SessionCreationPolicy.STATELESS)
      .and()
      .addFilterBefore(new LoginFilter("/login", authenticationManager()),
        UsernamePasswordAuthenticationFilter.class)
      .addFilterBefore(new AuthenticationFilter(),
        UsernamePasswordAuthenticationFilter.class)
      .csrf().disable()
      .headers().frameOptions().disable()
      .and()
      .httpBasic();
}
또한 SecurityContextHolder 클래스 에서 인증 을 설정하기 위해 AuthenticationFilter 클래스를 추가합니다.
public class AuthenticationFilter extends GenericFilterBean {

    @Override
    public void doFilter(ServletRequest req, ServletResponse res, FilterChain chain)
      throws IOException, ServletException {

        Authentication authentication = AuthenticationService.getAuthentication((HttpServletRequest) req);
        SecurityContextHolder.getContext().setAuthentication(authentication);

        chain.doFilter(req, res);
    }
}
7.4. JWT에서 테넌트 ID 가져오기
TenantContext 에서 현재 테넌트를 설정하기 위해 TenantFilter 를 수정해 보겠습니다 .
String tenant = AuthenticationService.getTenant((HttpServletRequest) req);
TenantContext.setCurrentTenant(tenant);
이 상황에서는 AuthenticationService 클래스 의 getTenant() 메서드를 사용하여 JWT에서 테넌트 ID를 가져옵니다 .
public static String getTenant(HttpServletRequest req) {
    String token = req.getHeader("Authorization");
    if (token == null) {
        return null;
    }
    String tenant = Jwts.parser()
      .setSigningKey(SIGNINGKEY)
      .parseClaimsJws(token.replace(PREFIX, ""))
      .getBody()
      .getAudience();
    return tenant;
}
8. Security 테스트
8.1. JWT 생성
사용자 이름 user 에 대한 JWT를 생성해 보겠습니다 . 이를 위해 자격 증명을 /login 엔드포인트에 게시합니다.

토큰을 확인해 봅시다:
eyJhbGciOiJIUzUxMiJ9.eyJzdWIiOiJ1c2VyIiwiYXVkIjoidGVuYW50XzEiLCJleHAiOjE2NTk2MDk1Njd9.토큰 을 디코딩할 때 대상 클레임 으로 설정된 테넌트 ID를 찾습니다 .
{
    alg: "HS512"
}.
{
    sub: "user",
    aud: "tenant_1",
    exp: 1659609567
}.
8.2. 샘플 요청
생성된 토큰을 사용하여 직원 엔터티 를 삽입하기 위한 게시 요청을 생성해 보겠습니다 .

Authorization 헤더 에 생성된 토큰을 설정합니다 . 테넌트 ID는 토큰에서 추출되어 TenantContext 에 설정되었습니다 .
9. 결론
이 기사에서는 다양한 다중 테넌시 모델을 살펴보았습니다.
별도의 데이터베이스 및 공유 데이터베이스와 별도의 스키마 모델에 대해 Spring Data JPA를 사용하여 Spring Boot 애플리케이션에서 다중 테넌시를 추가하는 데 필요한 클래스를 설명했습니다.
그런 다음 PostgreSQL 데이터베이스에서 다중 테넌시를 테스트하는 데 필요한 환경을 설정합니다.
마지막으로 JWT를 사용하여 테넌트에 Security을 추가했습니다.
항상 그렇듯이 이 예제의 전체 소스 코드는 GitHub에서 사용할 수 있습니다 .

